Setting Up Rules in Outlook

Setting Up Rules in the Outlook Desktop App
1. Open Outlook and Access Rules
Launch Outlook:
- Open the Outlook desktop application on your computer.
Access Rules:
- Navigate to the "Home" tab on the ribbon.
- Click on "File" in the top menu
- Select "Manage Rules & Alerts."

Launch Outlook:
- Open the Outlook desktop application on your computer.
Access Rules:
- Navigate to the "Home" tab on the ribbon.
- Click on "File" in the top menu
- Select "Manage Rules & Alerts."
2. Create a New Rule
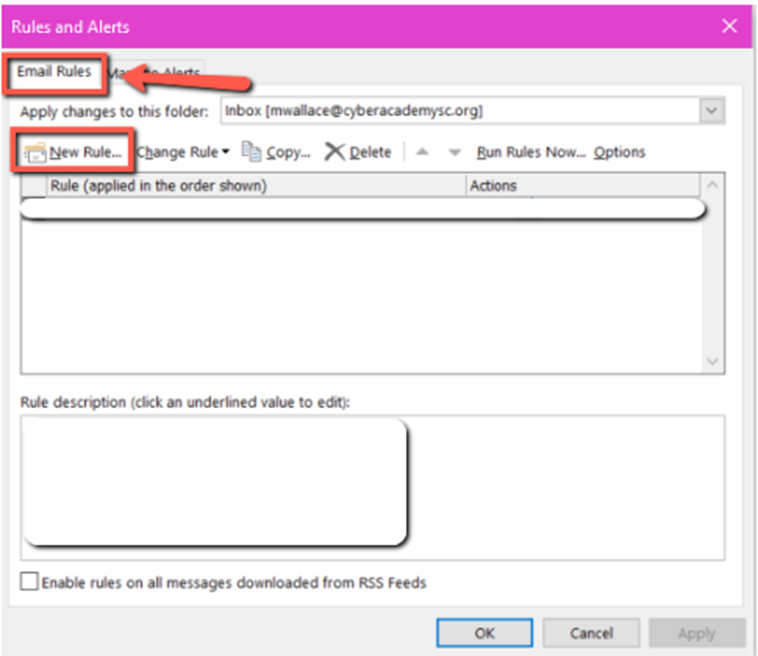
Rules and Alerts Window:
- In the "Rules and Alerts" window, click on "New Rule..." to start the rule creation wizard.

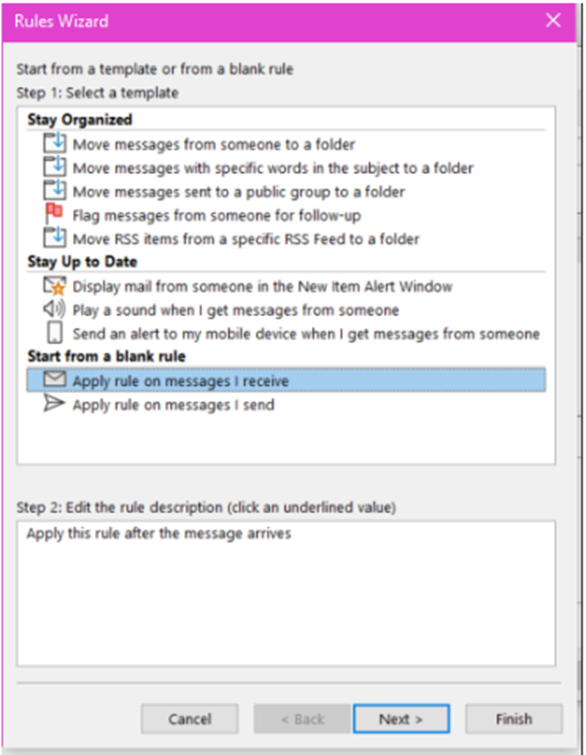
Choose a Rule Template:
- Under "Start from a blank rule," choose "Apply rule on messages I receive" and click "Next."

Rules and Alerts Window:
- In the "Rules and Alerts" window, click on "New Rule..." to start the rule creation wizard.
- In the "Rules and Alerts" window, click on "New Rule..." to start the rule creation wizard.
Choose a Rule Template:
- Under "Start from a blank rule," choose "Apply rule on messages I receive" and click "Next."
- Under "Start from a blank rule," choose "Apply rule on messages I receive" and click "Next."
3. Specify the Rule Conditions
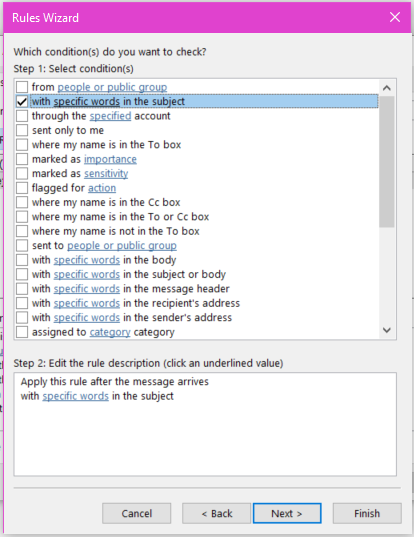
Select Conditions:
- Check the boxes for the conditions that determine when the rule will apply. Common conditions include:
- From people or public group: Apply the rule to emails from specific senders. Click on the underlined "people or public group" to specify the sender.
- With specific words in the subject: Apply the rule based on keywords in the subject line. Click on the underlined "specific words" to enter the keywords.
Add Multiple Conditions: You can select multiple conditions if needed. The rule will only apply if all conditions are met.
You will need to edit the rule description by clicking on the blue underlined value.
Click "Next" once you've set the conditions.

Select Conditions:
- Check the boxes for the conditions that determine when the rule will apply. Common conditions include:
- From people or public group: Apply the rule to emails from specific senders. Click on the underlined "people or public group" to specify the sender.
- With specific words in the subject: Apply the rule based on keywords in the subject line. Click on the underlined "specific words" to enter the keywords.
- Check the boxes for the conditions that determine when the rule will apply. Common conditions include:
Add Multiple Conditions: You can select multiple conditions if needed. The rule will only apply if all conditions are met.
You will need to edit the rule description by clicking on the blue underlined value.
Click "Next" once you've set the conditions.
4. Set the Actions
Select Actions:
- Choose what action should be taken when an email meets the conditions. Common actions include:
- Move it to the specified folder: Automatically move the email to a specific folder. Click on the underlined "specified" to select or create a folder.
- Permanently delete it: Automatically delete the email, bypassing the Deleted Items folder.
Additional Actions: You can add more actions if necessary. For example, you might want to move the email to a folder and mark it as read.
Click "Next" after setting the actions.
Select Actions:
- Choose what action should be taken when an email meets the conditions. Common actions include:
- Move it to the specified folder: Automatically move the email to a specific folder. Click on the underlined "specified" to select or create a folder.
- Permanently delete it: Automatically delete the email, bypassing the Deleted Items folder.
- Choose what action should be taken when an email meets the conditions. Common actions include:
Additional Actions: You can add more actions if necessary. For example, you might want to move the email to a folder and mark it as read.
Click "Next" after setting the actions.
5. Add Exceptions (Optional)
Specify Exceptions:
- If there are cases where the rule should not apply, you can specify exceptions, such as excluding emails from certain contacts or with certain words in the subject line.
Click "Next" once exceptions are set (if any).
Specify Exceptions:
- If there are cases where the rule should not apply, you can specify exceptions, such as excluding emails from certain contacts or with certain words in the subject line.
Click "Next" once exceptions are set (if any).
6. Finish Creating the Rule
Name the Rule:
- Give your rule a descriptive name for easy identification.
Rule Options:
- Run this rule now on messages already in "Inbox": Check this box if you want to apply the rule to existing messages in your inbox.
- Turn on this rule: Ensure this box is checked so the rule is active.
Click "Finish" to save and activate the rule.
7. Review and Manage Rules
Apply and Close:
- In the "Rules and Alerts" window, click "Apply" to apply the rules to your mailbox and then "OK" to close the window.
Managing Rules:
- To modify, disable, or delete rules, return to the "Rules and Alerts" window. Rules are processed in the order they appear, so use the "Move Up" and "Move Down" buttons to prioritize rules.
Additional Tips
- Test Your Rule: Send test emails to yourself to ensure the rule works as expected.
- Keep Rules Simple: Overly complex rules may be difficult to manage and troubleshoot. Try to keep rules straightforward.
- Backup Rules: You can export and import rules for backup or transfer between computers using the "Options" button in the "Rules and Alerts" window.
By setting up these rules, you can streamline your email management, ensuring that specific types of emails are automatically organized or removed as they arrive.
Related Articles
How to Add Safe Senders in Microsoft Outlook
Outlook has the ability to designate certain email addresses or domains as "safe senders." By adding these trusted senders to your Safe Senders list, you instruct Outlook to bypass its spam filters and deliver emails from these sources directly to ...Microsoft Outlook: Organizing Emails Into Folders And Color Coding
Tips to help you organize your emails Organizing Tips Slide ShowFamilies Unable To Access School Email
This article is for students using K12 Stride Office 365 School Email. ?? Troubleshooting Tips for Accessing Office 365 Email Students can access school emails directly from their Online School. Try the tips below to resolve common login issues — ...Gmail and Outlook: Requirements, Help, Warnings
Forward Gmail to Outlook Click link below: Forward Gmail to Outlook Account Outlook Help Outlook Calendar Basics How to Search your email folders Group email Email Signatures Creating An Email Signature How To Create An Email Signature In Outlook ...Recall A Sent Email
How To Recall Or Delete A Sent Email Select Sent Items in the left folder pane, then double-click the message to open it in a separate window. In the message window, go to File > Info. Select Resend or Recall > Recall This Message, and choose one of ...